If you haven’t built and launched water rockets with your kid, you’re missing out on an awesome project. With 10 bucks or so worth of parts, an air pump, and an empty soda bottle or two, you can have a blast of an afternoon and learn some elementary rocketry. Even the most jaded kid will be blown away by the sheer power and height of a properly constructed water rocket. I promise.
How Water Rockets Work
Water rockets work exactly like their big brothers at NASA. A reaction mass is forced out of a vessel with pressurized gas, sending the payload into the air. In this case, the pressure vessel is a soda bottle, the reaction mass is plain water, and the pressurized gas is air pumped in with a bicycle pump. With these simple concepts, you can send a Coke bottle hurtling hundreds of feet into the air and impress all the other kids at the playground. Maybe it’s not as remarkable as the launch of an Apollo rocket, but I’ll bet Elon Musk’s first launch was a water rocket.
Building Your Rocket

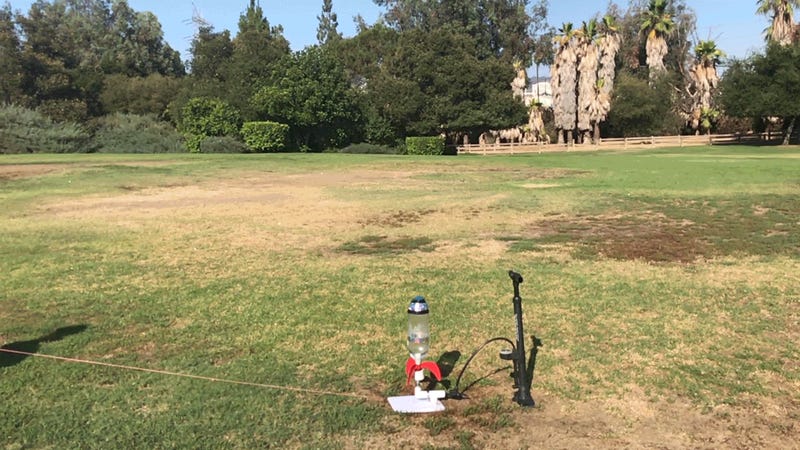
The rocket you see above, Zeus III, is a simple-as-possible design built in about 20 minutes with a few things we had lying around the house. It’s an empty soda bottle, some plastic fins, the tip of a foam football, and some sparkly tape for decoration.
Advertisement
Some water rocketeers make two-bottle rockets, build self-deploying parachutes, or construct elaborate multi-stage water-rockets, but we’re keeping it simple: just a plastic bottle, a nose cone, and some fins.
The Bottle
Any brand of pop will do for your rocket bottle, and you can use any size, but we’ve had the best results with a standard two-liter bottle. Just make sure it’s a soda bottle. Bottles designed for non-carbonated beverages may not be able to handle the internal pressure you’re about to put them through and could fail or explode. You don’t want that.
The Nose Cone

We went with the tip of foam football for our rocket’s nose. While the general rule for any kind of rocketry is to keep things as light as possible, a little extra weight at the top to helps encourage a smooth and stable ascent, so you have to put something up there.
Advertisement
A longer, thinner nose cone would probably work better aerodynamically, and a little extra weight might provide a smoother lift-off, but for your first try, the tip of a Nerf football should more than suffice. Your rocket is going to fall down to earth hard, and you’ll be glad you went with a soft nose cone should it accidentally land on a car windshield or some kid’s skull.
Building the nose cone is easy: Measure the circumference of the top of the bottle, find that same point on the football, mark the area to be cut, and go to town. You can use a utility knife or an old kitchen knife, but I used an electric saw, because I’ll take use any excuse to fire up the electric saw.
Advertisement
If you want to make a more elaborate craft, there are plans online for adding a self-deploying parachute to water rockets and even multi-stage rocket guides. Personally, I didn’t find parachutes to be worth the effort. We built a rocket with a parachute earlier this summer, which soared majestically 150 feet in the air… but the wind caught it on its descent, and blew it into the top of a huge oak tree in North Hollywood. R.I.P., Zeus II.
The Fins
All rockets need fins or they’ll tumble end-over-end soon after launch, killing all on board. To save trouble and just get to flying, we used reusable store-bought fins, but making your own is simple too: Cut three or four fin shapes from foam core, and glue them to the side of your rocket. To make the rocket fly straight, all your fins need to be the same size and spaced evenly over the sides of your rockets. Here’s an in-depth video explaining exactly how to craft and attach water rocket fins.
Decoration
Once your rocket is built, decorate it! Add glitter or a scary face, or keep it NASA-appropriate with a gleaming white paint job. The only necessary marking is a fill line for your water. You want to mark where the bottle is one-third full, so you can easily find the sweet spot of water to air.
Advertisement
To get the best flight possible, keep the weight as low as possible. Try to steer your kid away from decorating it with too many strips of tape or anything else heavy. We kept ours to a couple line of tape: One to hold on the nose cone and one to mark the water line. It’s lighter this way, and it shows we are not effing around here: we are going to space, not having a beauty contest.
The Launcher

Now that you’ve built your rocket, you gotta build a launch pad. This is the most complicated part of your water rocket journey. There are a ton of launcher options available, from very simple designs that are basically putting a cork in your bottle and shoving in an air valve, to three-rocket launchers or launchers with a built-in pressure release valve and pressure gauge.
Advertisement
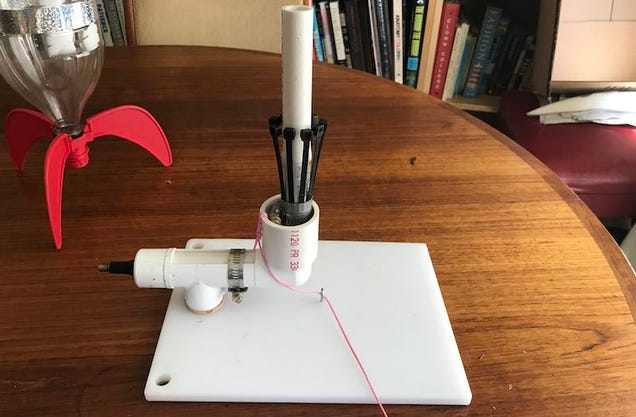
Our launcher is fairly simple. It’s made of about ten bucks worth of parts from Home Depot, and we’ve used it a ton with no problems. We used a small cutting board for the base, a tire valve to pump in air, a PVC elbow joint, and a release mechanism made of cable ties, a PVC pipe sleeve, and piece of string. It’s close to Make’s water rocket launcher, but with a different base and without the vinyl tubing.
It works like this: As you pump air into the bottle and the pressure builds up, the cable ties and the sleeve hold the rocket onto the launch pad. When you’ve added enough air, you pull the PVC sleeve down and the cable ties release your rocket into the air. This is called a “Clark Cable Tie Release Mechanism.” It’s a simple, elegant design and an incredibly nerdy fact for me to know.
(If you’re not handy, and just want to skip the trial, error, and headaches of building your own launcher, you can buy one on Amazon. I won’t tell anyone.)
Launch Day!

Now that you’ve built and decorated your rocket and launcher, it’s time to see if the bird will fly!
Advertisement
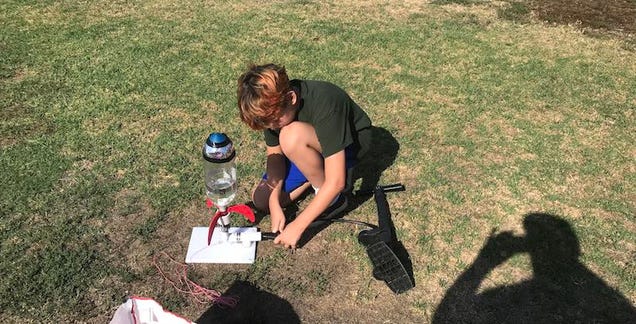
Other than the rocket and launcher, you’ll need water as “fuel” and a bicycle pump. Make sure it’s a pump with a pressure gauge. You won’t be able to estimate without one, and it’s important to avoid over-inflating your rocket.
Do not launch from your backyard, unless it’s huge. Even perfectly made water rockets can be blown far off-course due to wind, and any design flaw will reveal itself with a flight that takes your rocket way off course. So make sure you have a lot of space and are far from trees, houses, electrical lines, and other obstacles … and don’t get too upset if it ends up on a roof anyway.
Launch Safely

I’ve never heard of anyone being injured by a water rocket, but I guess it’s possible: You’re packing a ton of air pressure into a small space, and they shoot pretty fast, so use some common sense.
- Don’t aim them at anyone.
- Don’t stand over them while adding air.
- Don’t shoot them near electrical wires.
- Make sure everyone stands clear of the craft during launch.
- Don’t over-inflate your rocket.
For optimum height, the conventional wisdom says to fill your bottle 1/3 full of water, but feel free to play around with other ratios; it won’t hurt anything.
Advertisement
When pumping your rocket, keep an eye on the PSI gauge. Standard soda bottles generally fail at around 150 PSI, but you don’t want to go anywhere near that level; your carefully built rocket exploding into plastic shrapnel will ruin your day, I promise. A rocket launched at 50 PSI is still spectacular, and you shouldn’t ever push it over 90 PSI.
Oh, and don’t forget the countdown before you pull the string and take flight. Building suspense is the best part of any rocket flight. And don’t forget to film it! I mean, check this out:
from Lifehacker http://bit.ly/2MmX8OO
via IFTTT
